Everything Nuventa does, in one place
Reference guide to prepare service agents, train new staff, and explain every function to a shop owner — module by module, with who can use what and the details that aren't obvious at a glance.
Roles & Permissions
Who can do what inside a store — the foundation for understanding the rest of the manual.
Every person who works in a store has a role. The role comes with a default permission package; the owner can also grant or remove specific permissions for a particular person if the store has the granular permissions feature enabled (see Users).
Default permission matrix
| Permission | Owner | Admin. | Cash.+Aux. | Cashier | Auxiliary | Read-only |
|---|---|---|---|---|---|---|
| Open / close register | ✔ | ✔ | ✔ | ✔ | — | — |
| Build sale (take order) | ✔ | ✔ | ✔ | — | ✔ | — |
| Collect payment | ✔ | — | ✔ | ✔ | — | — |
| Void sale | ✔ | — | ✔ | ✔ | — | — |
| View sales | ✔ | ✔ | ✔ | ✔ | — | ✔ |
| Grant / pay down credit | ✔ | Payments only | ✔ | ✔ | — | — |
| Waive late fee | ✔ | — | — | — | — | — |
| Edit inventory | ✔ | ✔ | — | — | — | — |
| View inventory | ✔ | ✔ | ✔ | ✔ | ✔ | ✔ |
| Suppliers | ✔ | ✔ | — | — | — | View only |
| Reports | ✔ | ✔ | — | — | — | ✔ |
| Create / edit users | ✔ | — | — | — | — | — |
| Store settings | ✔ | — | — | — | — | — |
| Costs / P&L | ✔ | ✔ | — | — | — | — |
These are the default permissions for each role. With the granular permissions feature enabled, the owner can grant or remove specific permissions for a given employee from Users.
POS Terminal T-1
The point of sale: build the cart, collect payment, and print the receipt.
This is the screen a shop owner uses all day: search or scan a product, adjust quantities, and collect payment. It requires an open register shift — whoever has permission to open/close the register does so once at the start of the day and closes it at the end, counting expected vs. actual cash.
How a sale is made
- With the shift open, products are added to the cart (searching by name or scanning a barcode).
- If applicable, a customer is selected (required to sell on credit, see Credit (Fiado)) or it's left as a walk-in sale.
- When collecting payment, the payment method is chosen (cash, Nequi, Daviplata, card, credit/fiado, or a mix of several) — the system requires the sum to match the total exactly. With credit, before anything is registered the projected installment plan is shown with real Confirm/Cancel buttons — nothing is created or printed until Confirm is tapped.
- A printable receipt or an electronic invoice is generated, depending on the "Issue electronic invoice" checkbox (see Electronic invoice or receipt). If it was on credit, the same receipt includes "PAYMENT METHOD: CREDIT" and the full installment plan.
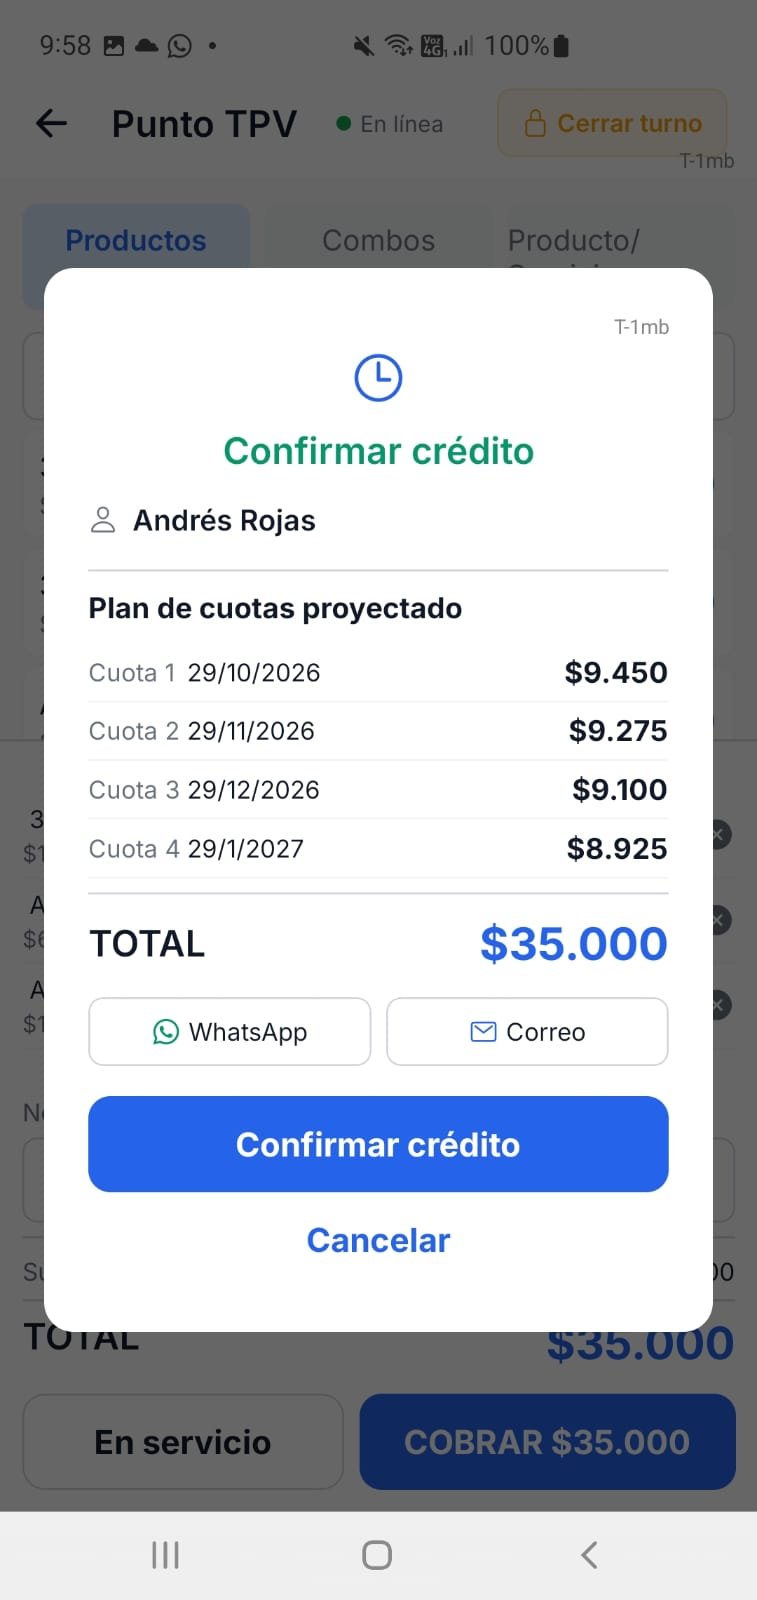
Projected installment plan — Confirm or Cancel, nothing created yet.
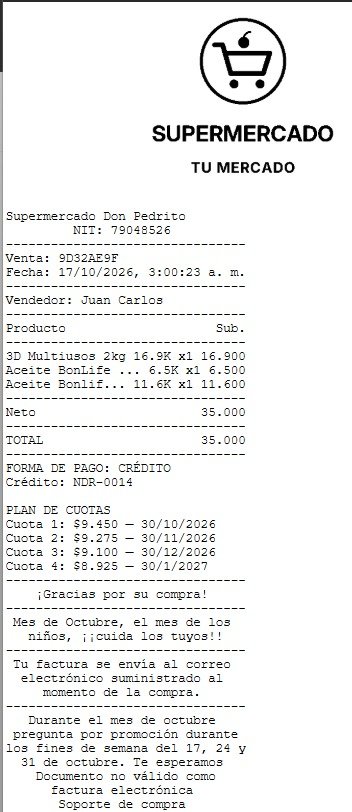
Receipt for a credit sale, with the installment plan included.
Create Work Order
For a Product/Service with later delivery (repair, custom order): "Create Work Order" button in the cart. It asks for the customer (searches and lists as you type) and the promised delivery date. The order stays visible with its status until marked as delivered.
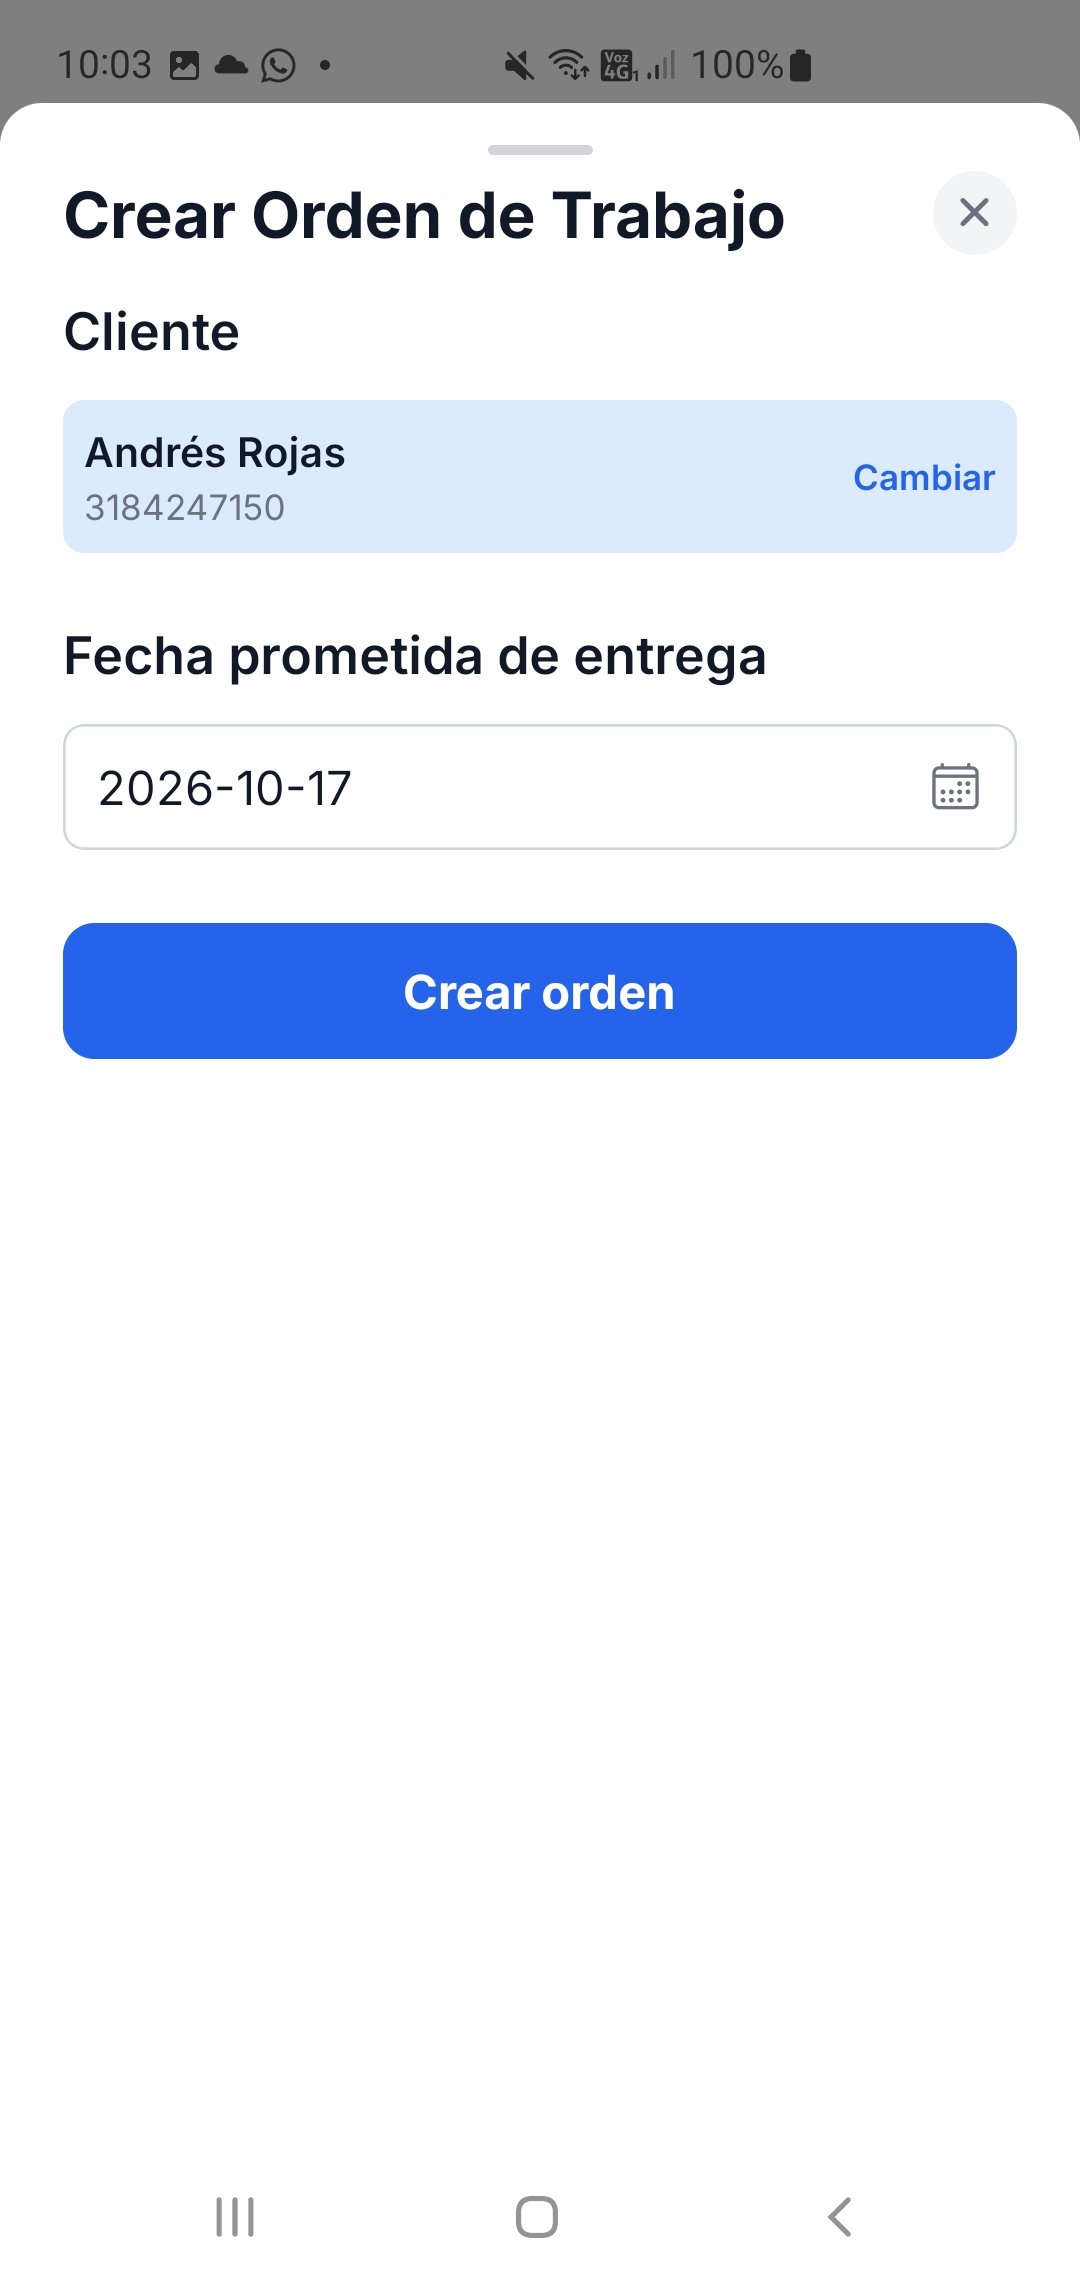
Create Work Order: customer already picked, promised date set.
"In service" instead of collecting payment
In busier businesses (bakeries, restaurants) whoever builds the cart can tap "In service" instead of collecting payment right away — the sale is frozen and moves into a shared queue for someone else to collect payment on it. See the full flow in In Service.
In Service T-2
The checkout queue — to separate "who takes the order" from "who collects payment".
Designed for a business where one person "takes the order" moving around the venue (a waiter, someone doing curbside handoff) and a different person collects payment at the register, without the first person having to wait for payment to keep serving.
How it works
- An auxiliary builds the cart in the POS Terminal and taps "In service" — the sale is "frozen" (stock is already deducted) and appears in the shift's shared queue.
- A cashier opens In Service and sees the list of pending receipts in arrival order, with who built it and how long it's been waiting.
- Tapping a receipt goes straight to payment collection — they cannot modify the cart, only receive the payment.
The list refreshes itself every few seconds while the screen is open. A frozen sale can still be edited (add/remove products) or canceled before payment is collected.
Print Point IM-1
Sends order tickets between phones, tablets and laptops — kitchen, bar, or any zone.
Solves a typical problem for businesses with zones (a bakery with Kitchen and Pizza, a hardware store with a dispatch area): someone sends a text note ("Table 4: 2 juices, 1 pizza") to a zone, and whoever is the owner of that zone sees it appear and prints it — no matter which phone, tablet, or laptop each person is logged into.
Zones and "owner"
A zone (Kitchen, Bar, Register, Dispatch…) is created from Zones Point. The "owner" of a zone is a person, not a device: anyone can make themselves the owner of a zone from that zone's menu ("Become owner of this zone") and stop being the owner when their shift ends. That way, no matter which device they're logged into, they see what's theirs.
How it's used
- Someone opens Print Point, chooses the destination zone, and types the content (or it's received automatically from a sale with products assigned to that zone).
- The owner of that zone sees the job appear in "Pending" — on the same terminal it appears instantly; on another one, within a few seconds.
- Tapping "Print": on laptop/browser it opens Windows' normal print dialog (it does require a confirmation click, that's a browser limitation, not Nuventa's); on Android with the RawBT app installed and a Bluetooth printer already paired, it can print with no further clicks.
Offline Mode
The "emergency register" — keep selling when the internet goes down, without losing the sale.
Built for a mid-day internet outage, not for running the business without internet permanently: while a designated device has no signal, it can keep charging cash sales with whatever it already had loaded, and everything syncs on its own as soon as the signal comes back — no special action needed from the cashier.
Turning it on and designating the device
- This is a plan-gated feature (like coupons or costs) — if it doesn't show up, the current plan doesn't include it.
- With the feature active, the Owner goes to Configuration Point and designates a single device (the phone, tablet, or laptop that will stay fixed at the register) as the "offline station." Only that device can sell without a connection — any other phone logged into the same store cannot.
- Once designated, that device downloads a copy of the catalog (products, prices, customers, combos) to have ready in case the signal drops.
What happens when the signal drops
On the designated station, a colored dot next to the Register header shows whether there's a connection or not. When it's lost, if a shift was already open, the screen enters emergency mode on its own: the product search keeps working (against the local copy of the catalog, not the internet), and cash sales can keep being charged normally.
What does NOT work without a connection
- Store credit — blocked; cash only.
- Combos — not offered in emergency mode.
- Opening a new shift — if the shift wasn't already open before the signal dropped, one can't be opened without internet.
- Creating new catalog items — new products, customers, or suppliers can't be created without a connection, only sell what already existed.
- Switching devices — if the cashier moves to another phone mid-outage, that other phone doesn't have the sales queue or emergency mode active.
The provisional receipt
Every offline sale prints a provisional receipt (numbered PROV-0001, PROV-0002…) with the notice "NOT AN ELECTRONIC INVOICE" — it's the proof of purchase handed to the customer on the spot. It carries no CUFE or QR code.
Accents and ñ: the printer (with RawBT) prints accented letters and ñ correctly. Capital Á, Í, Ó, Ú print without the accent because thermal printers don't have those letters.
Laptop / browser
On a laptop, nothing extra needs to be installed: it works as long as the app.multitend.com tab is already open when the signal drops. If the browser is closed or the computer restarted without internet, it can't be reopened until the connection is back — so on a laptop meant as an offline station, it's better to leave the tab open and not shut down the computer.
Electronic Invoicing
A real DIAN invoice, with CUFE, at checkout — or a receipt, chosen sale by sale.
When a store is required to (or simply decides to) invoice electronically, every completed sale can also generate a real electronic invoice with the DIAN — with a verifiable CUFE, under that store's own NIT, not a third party's. At each checkout you decide whether an electronic invoice or a receipt comes out (see below).
How to enable it
- In Settings, enter the NIT and select the store's real Department/City.
- Turn on the "My business is required to invoice electronically" switch.
- The first time a sale is completed after enabling it, the system automatically registers the store with the invoicing provider (no manual paperwork needed from the store with the provider) and from then on, every sale charged with the "Issue electronic invoice" box checked comes out as an invoice.
Electronic invoice, POS document or receipt, sale by sale
At checkout (Charge screen T-1m), under "Sale document" the cashier picks one of three:
The default document chosen by the owner in Settings comes pre-selected, along with the receipt prefix. The cashier can change it on each sale.
Customer details: the customer's name and ID document now also print on the receipt, not only on the electronic invoice — unless the cashier unchecks "Identify the customer on the invoice or receipt"; in that case it shows Final Consumer ("Consumidor Final").
Turning a receipt into an invoice later: in Reports → tap the sale → "Issue electronic invoice". The sale that came out as a receipt becomes an electronic invoice and is reprinted. It only works if the store has invoices available; otherwise the screen shows the reason.
What changes on the receipt
With the switch on and an authorized invoice, the printed receipt shows the full legal header: store name and NIT, "ELECTRONIC SALES INVOICE," number and resolution, issue date, buyer, and the CUFE at the bottom.
If the store does NOT invoice electronically: own resolution
Voiding a sale: in Reports → tap the sale. If it has an electronic invoice, the button is "Void invoice" (it issues the Credit Note to the DIAN). If it went out as a receipt, the button is "Void sale" and asks for a reason. Only the Owner and the Administrator see it. Either way the goods return to inventory and, if there were points, the redeemed ones are returned and the earned ones removed. A credit sale with an active credit is voided from Credit.
With the switch off, the store can still have its own DIAN resolution (paper receipt book/manual POS) — in Settings, 4 free-text fields then appear: prefix, numbering from/to, and the resolution date (entered by the owner; Nuventa does not validate them against the DIAN). With that data entered, the receipt prints a real invoice number (fixed per sale — reprinting always shows the same one) and the authorized range, without a CUFE. If the store doesn't enter any of this, the normal receipt still prints with the notice "not valid as an electronic invoice — proof of purchase."
Seller's tax qualities
In Settings, always visible regardless of whether invoicing is electronic or manual: three switches — Large Taxpayer ("Gran Contribuyente"), Self-Withholding Agent ("Autorretenedor"), and VAT Liable ("Responsable de IVA"). These are data required by the DIAN on any invoice when they apply. When the store invoices manually (own resolution), these qualities print directly in the receipt header along with the rest of the legal data.
More than one provider and own accounts (Advanced, Super Admin only)
The design isn't tied to a single provider: today only the MATIAS adapter exists, but the system supports adding others without a redesign. If a customer already has their own contracted account (with MATIAS or another future provider) instead of using Multitend's shared account, that's configured in Admin Panel → Stores → Advanced — never entered by the shop owner themselves from their own Settings. There, the Super Admin picks the provider and, in "Customer's own" mode, pastes that account's URL and token. The token is never shown in full (it's masked, last 4 characters only) and it isn't stored in plain text in the audit log either.
Inventory I-1
Products, categories, stock movements, and stock counts.
Products
Each product has a name, sale price, purchase cost (required to be able to sell it, feeds the P&L), current/minimum stock, an optional barcode, and a category ("product type") which is also used for Promotions by group.
Next to the search box there are three filters — All / Simple / Product-Service — to see just one of the two types among the rest of the catalog.
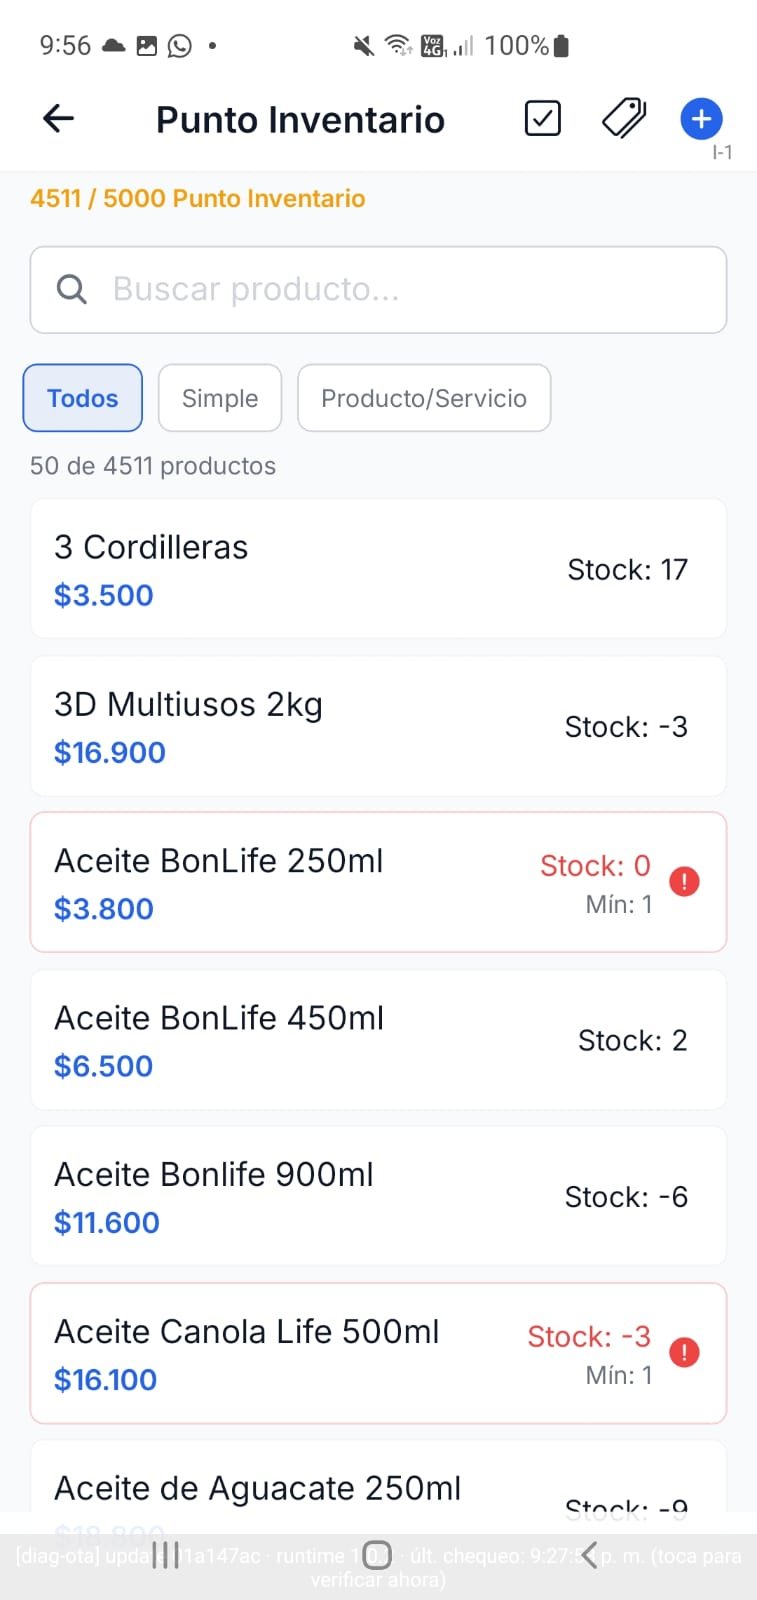
Type filter, next to the Inventory search box.
Product/Service
Built for businesses that don't sell by physical units (barbershop, restaurant, repair shop, laundry): it carries no stock or purchase cost. Instead of a fixed price, it can have a range (minimum and maximum price) that's adjusted at checkout. Two fields of its own:
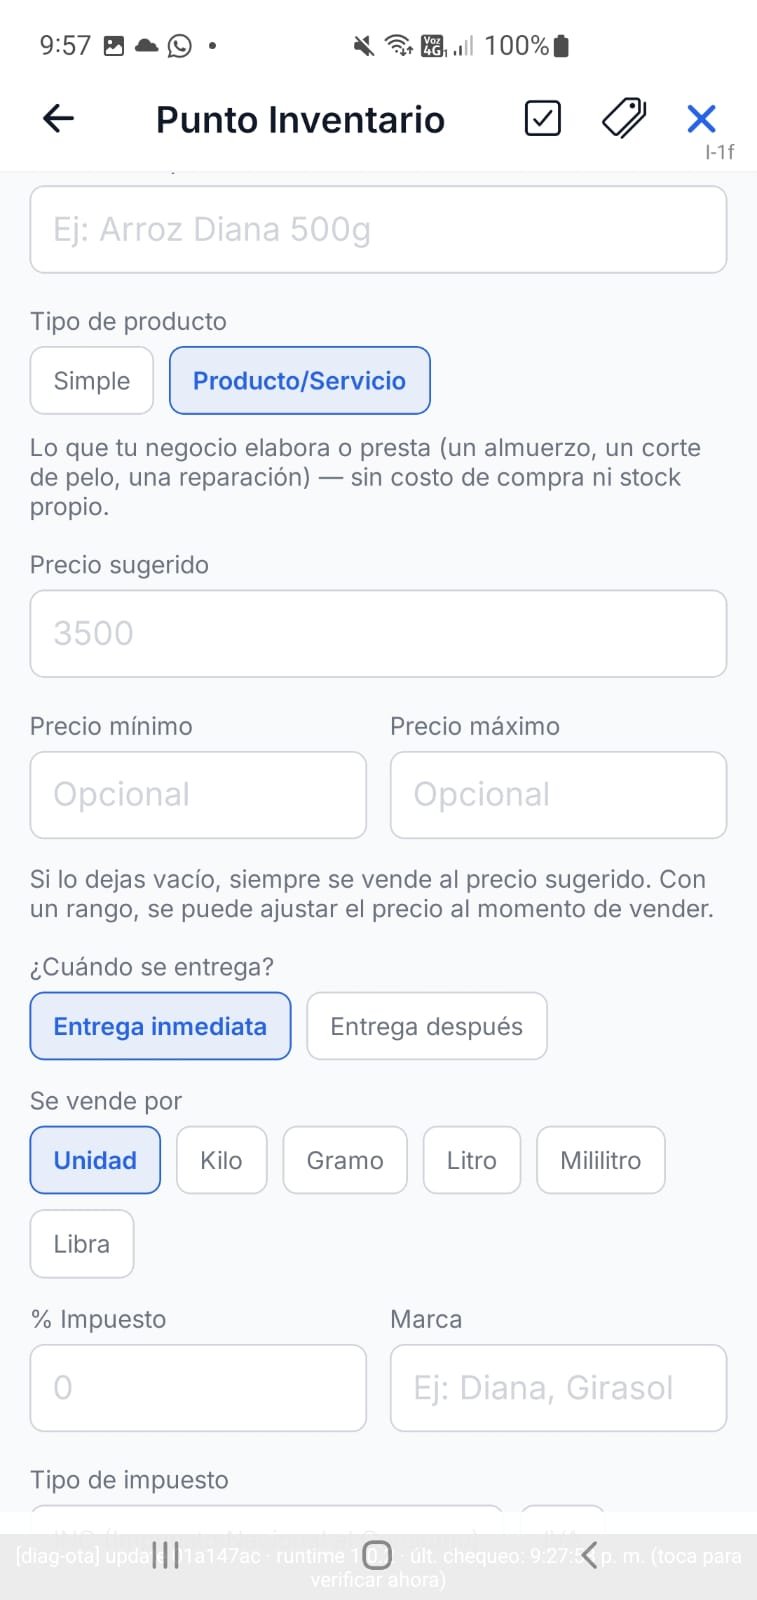
Product/Service form: type, price range, and delivery.
Tax type
A product's tax selector only shows the tax types the store has active (IVA and INC by default). The full catalog has 22 real Colombian tax types (including special ones like the sugary-drinks tax) — activating them is the Super Admin's job, see Admin panel → Settings.
Inventory movements
Every stock change is recorded with a type (in, out, adjustment, shrinkage) — stock is never edited by hand without leaving a trace. Stock-ins from supplier purchases are linked automatically when an order is received (see Suppliers).
Stock count
Physical count of actual stock vs. what the system believes is on hand — records the difference and stays in the history, useful for detecting losses.
Zones Point I-4
Create zones and assign products to them — what the Print Point uses to know who to notify.
A standalone point on purpose (it used to live inside Inventory): a restaurant-type store uses Zones all the time to send tickets to Kitchen/Bar, but doesn't necessarily manage unit-based products with cost/weighted average cost — there's no reason to make it go through Inventory just to reach Zones.
This is where zones (Kitchen, Bar, Register, Dispatch…) used by Print Point are created, and products are assigned to them — so a sale that includes "Pizza" knows that item should notify the Kitchen zone.
A zone's "owner"
The "owner" of a zone is a person, not a device: anyone with access to Print Point can make themselves the owner of a zone from that zone's menu ("Become owner of this zone") and stop being the owner when their shift ends. That way, no matter which device they're logged into, they see what's theirs. Becoming a zone's owner does NOT require entering Zones Point — that action lives inside Print Point.
Suppliers PR-1
Who the store buys from, how much it owes them, and the order history.
Supplier profile: name, NIT, phone/WhatsApp, contact, city and address. The number of active suppliers that can be created depends on the store's plan.
Balances and statement
The "balance" with a supplier is never entered by hand — it's calculated automatically: merchandise received from that supplier, minus returns, minus any payments recorded against them (see Costs). A positive balance is what the store owes; a negative one means they've already overpaid (a credit balance). The statement shows the full timeline with a running balance.
Orders
- An order is created by choosing products and quantities — it stays in draft.
- When the merchandise arrives, the actual quantity received for each product is confirmed (it can differ from what was ordered) — this updates inventory automatically, with no need to record the stock-in separately.
Costs CO-1
Operating expenses that don't come from a sale — rent, utilities, payroll.
This is different from day-to-day petty cash — this is where the fixed/operating expenses of the business go. First, cost types are created (free-form categories: Payroll, Utilities, Transportation…), and then individual costs are recorded with a date, amount, and detail.
A cost can optionally be linked to a supplier — that's exactly what counts as a "payment" toward that supplier's balance (see above). Every cost recorded feeds directly into the "Overhead costs" line of the Profit and Loss report.
Customers C-1
Each customer's profile and their credit traffic light.
Name, phone/WhatsApp, ID document (type and number), address, and the credit limit (the credit line extended to them). Each customer shows an automatic traffic light:
The credit limit here is exactly the ceiling that Credit (Fiado) checks before allowing a new sale on credit.
ID document required
The ID document type and number (cédula, NIT, etc.) is required when creating and also when editing a customer — it won't save without it.
Creating a customer while charging
The cashier doesn't have to leave the sale: in the POS Terminal, Charge → Select customer → "Create new customer". It opens the same full form, already filled in with what was typed in the search box. On saving, the customer stays selected in the sale and the cart is kept.
Credit limit: permission only
The credit limit field only shows up for whoever has the "Set customer credit limit" permission — the owner by default; it can be given to others in Users → Permissions.
Customer points
If the store has Loyalty points, tapping a customer shows the line "Points: X ($Y)" / "View points", which opens their points balance and history.
Credit (Fiado) F-1
Customer credit, installments, payments, and overdue accounts.
Selling on credit from the POS Terminal generates a credit line with its installment plan. From here you see each credit's detail, record payments, and identify overdue accounts. Only the owner can waive a late fee (forgive the overdue surcharge) — no one else has that permission by default.
The automatic block on new credit for a customer who is overdue (and the interest/late-fee/grace-period rules) are configured in Settings.
Validate new credit by email (optional)
Toggle in Settings, off by default. When on and the customer has an email on file: before confirming a new credit, a 6-digit code is sent to the customer's email — they tell it to the cashier, who types it in to confirm. Every new sale asks for its own code, even for the same customer from a minute ago. If the customer has no email on file, the credit is granted anyway, without this step — it never blocks a sale.
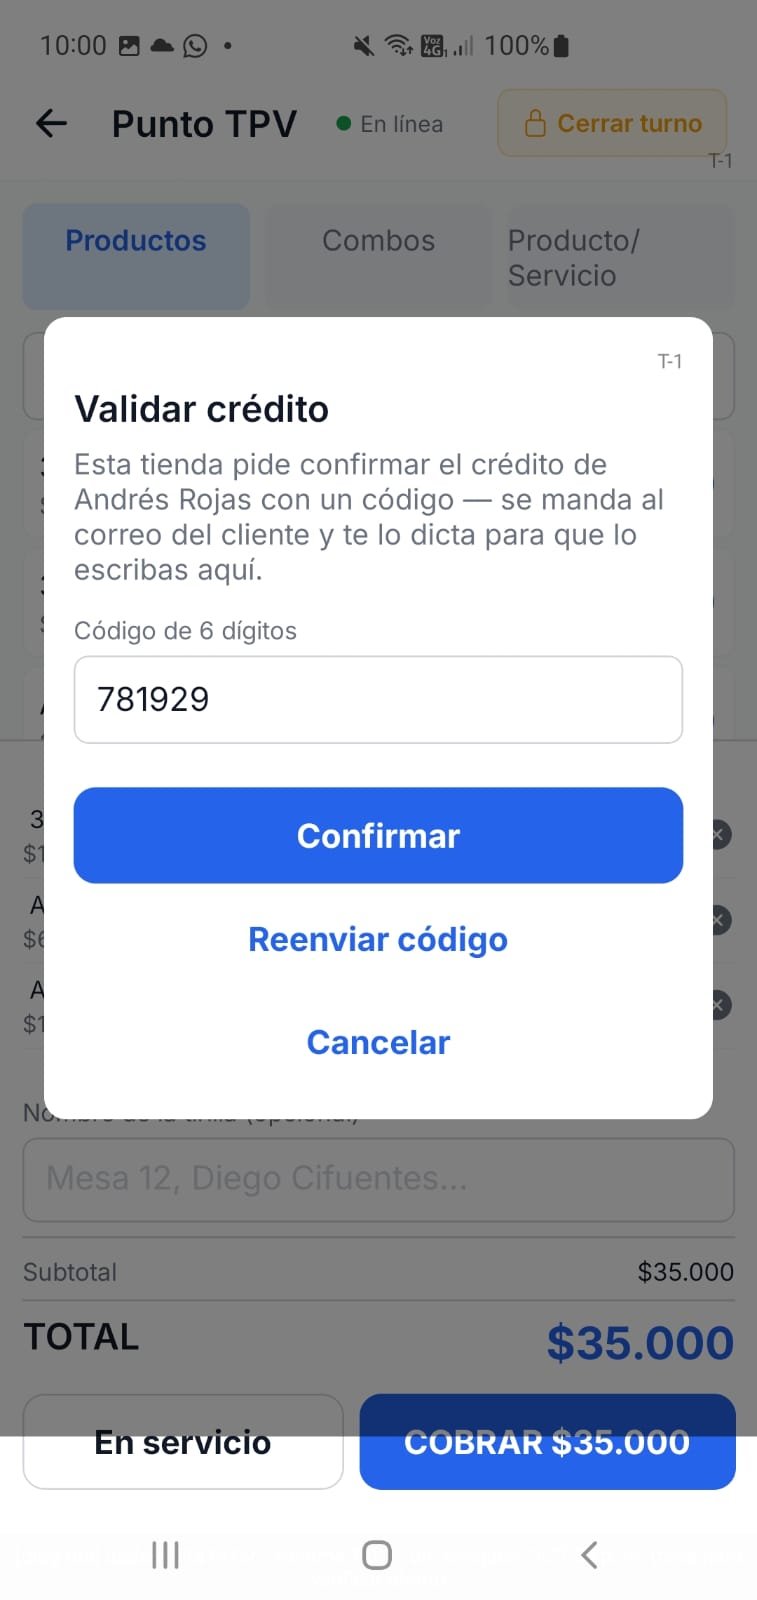
6-digit code sent to the customer's email.
Loyalty points CFG-1ma C-1ma
Reward customers who come back: every purchase adds points that are worth money.
Every time an identified customer buys, they earn points according to the rule the store sets, and can later redeem them as a discount at checkout. The customer sees their balance on the receipt, and the cashier sees it at checkout and on the customer's profile.
Setting up points CFG-1ma
In Settings → "Loyalty points" → "Set up points" button. The owner does this, or an employee the owner has given the "Set up points" permission in Users → Permissions.
The window also shows a summary of how everything is set up. How customers use their points: Redeeming points.
Fixed rules (not configurable)
- Only sales charged to an identified customer earn points. A sale without a customer earns nothing.
- A sale that got a promotion discount does NOT earn points.
- A sale with a combo DOES earn points.
- Credit (fiado): a credit sale earns points when the customer pays, in proportion to the amount paid — each payment adds its share. If that credit sale had a promotion, that part earns nothing.
- Voiding a sale returns (removes) the points that sale had generated.
- Expired points drop out of the balance on their own and show in the history as "Expired".
- Sales made without internet earn their points when they sync.
Where points show up
Redeeming points (discount at checkout)
The customer uses their points as a discount on the purchase. The cashier does it at checkout; no extra permission is needed.
- Build the sale and tap Charge.
- Pick the customer. If they have at least the minimum points to redeem, "Redeem points" appears under their balance.
- Tap it: the app suggests the maximum usable on that sale. Change it if the customer wants to use fewer and tap "Apply".
- The summary shows a "Points discount" line and the total goes down. Charge the rest with any payment method.
- Voiding a sale with a redemption gives the redeemed points back to the customer (shown in their history as "Earned · redemption returned by void") and removes the points that sale had given.
- The receipt shows "Points redeemed" and "Points discount", plus earned points and balance. Each product shows its share of the discount ("Points: -$...").
- The electronic invoice reports the redemption as a discount on each product, with VAT recalculated.
- Redeeming is not available on credit nor offline: it needs the customer's real balance at that moment.
Reports R-1
Sales, credit, supplier balances, and Profit & Loss.
A single screen with tabs: Today / Week / Month (total sales, breakdown by payment method, history), Credit (current ledger status and credit granted by period), Suppliers (same balances as Suppliers), and P&L.
Navigating weeks and months
Week: navigate forward and back with arrows, one real week (7 days) at a time — it can't go past the current week. Month: it's a real calendar month (not "the last 30 days") — navigate with arrows one month at a time, or tap the label in the middle to jump straight to any month/year, or switch to "Full year" (January 1st to December 31st of the chosen year, with arrows to change year; it always opens on the current year so you can see how things are going).
Credit: current status vs. granted
Inside the Credit tab there are two distinct views, not just another filter:
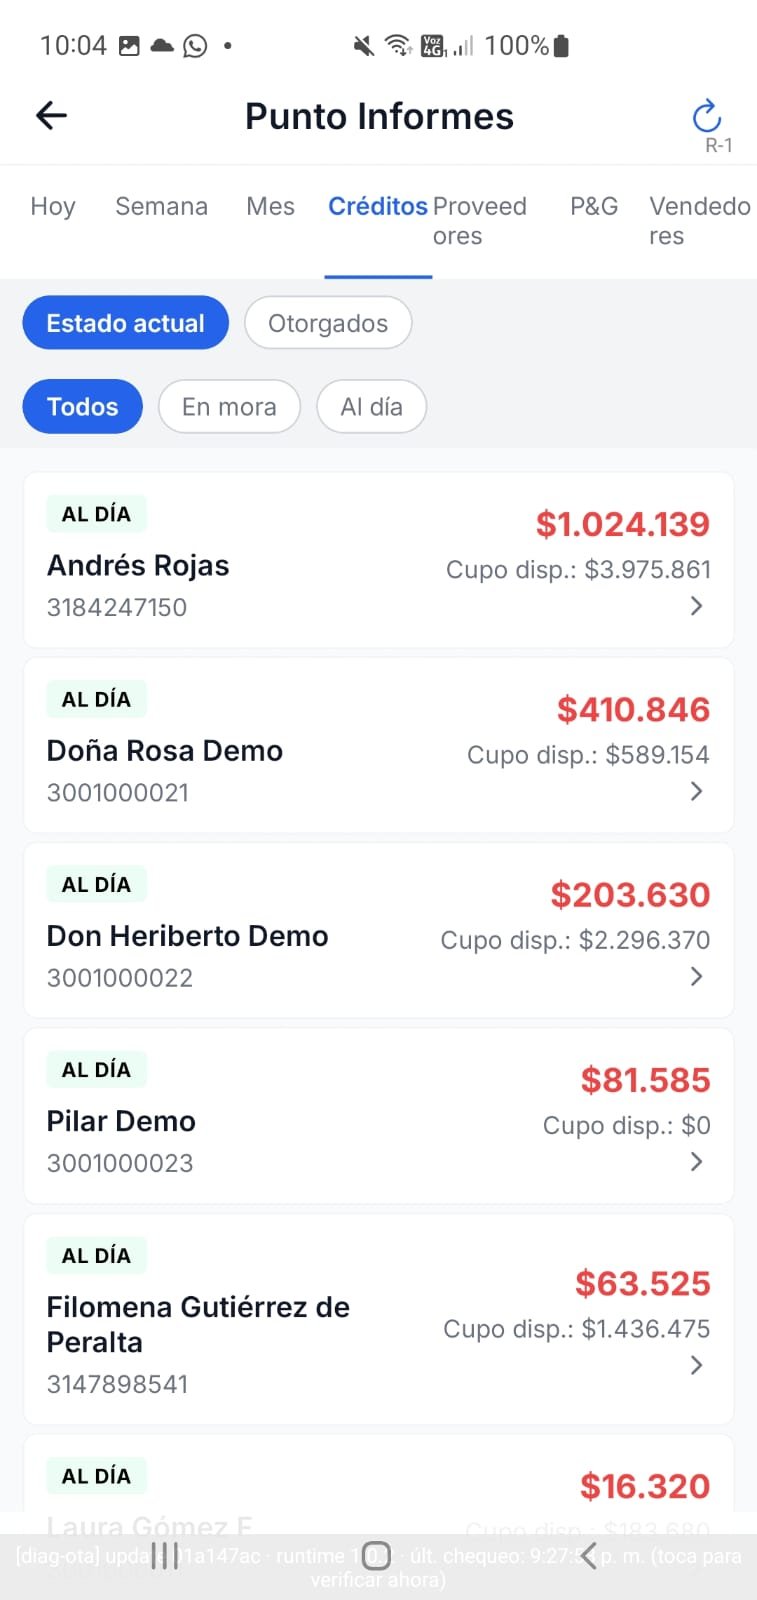
Credit tab, with the Current status / Granted selector.
Profit and Loss (P&L)
By calendar month or calendar year, it shows:
Combos CB-1
"2x1"-type deals or "second item at a discount" that activate on their own.
A combo is built from one or more products and a validity window: by date range or by days of the week (with an optional time window, e.g. only Tuesdays and Thursdays from 12 to 3pm). An expired combo stops applying on its own, with no one having to deactivate it by hand.
The discount for each product in the combo is defined one of three ways: % discount, fixed amount, or "buy X, pay Y" (the system calculates the real % itself, never trusting a made-up percentage).
Promotions Coming soon
Automatic discounts based on purchase amount — the backend already exists, the screen is still missing.
Once available: a % discount that applies to the cart automatically when the sale total (or the total for a specific group of products/categories) exceeds a defined minimum amount — with no manual action needed from the cashier. Multiple promotions can apply at once on the same sale.
Users U-1
Create employees, assign roles, and fine-tune specific permissions.
Creating an employee
- Phone number (unique across the whole platform), temporary password, first and last names.
- Choose the role: Cashier+Auxiliary, Cashier, Auxiliary, Administrator, or Read-only — another Owner can never be created from here.
- The employee is required to change their password on first login.
The number of users that can be created depends on the store's plan.
If an employee forgets their password
The owner generates a one-time code from that employee's menu and gives it to them verbally (via WhatsApp, in person) — the owner never sees or sets the new password. The employee resets it themselves by answering the 2 security questions they set up on their first login.
Granular permissions
With this paid feature enabled, the owner can also check or uncheck specific permissions for a given employee, beyond what their role includes by default — for example, giving a Cashier+Auxiliary permission to void sales even though their role doesn't include it by default.
Open sessions and the store's quota
Each store has a quota of sessions that can be open at the same time. In the Active sessions list (in Punto Usuarios; the Super Admin also sees it in the admin panel), each session shows whether it's from the web or the phone app and the last digits of its IP (the internet address it connected from) — so you can tell which one to close.
On the login screen, if the quota is full and one of the occupied sessions is your own, a "Close my other session and log in here" button appears. It asks for your phone and password again, and only closes your own sessions — never someone else's.
Settings CFG-1
The store's information, credit rules, and automated messages.
Store information
Name, NIT, phone, address, country, Department and City (chosen from dropdown lists tied to a real catalog, not typed by hand — required if the store invoices electronically), the person responsible, the three tax qualities (Large Taxpayer / Self-Withholding Agent / VAT Liable, always visible), and the electronic invoicing switch. With the switch on, an invoicing provider selector appears (today only MATIAS); with the switch off, the own-resolution fields appear (prefix, numbering from/to, date) — see Electronic Invoicing for details on both cases.
Credit rules (fiado)
Installment cutoff days, monthly interest %, daily late fee %, grace period days before something counts as overdue, whether or not to block further credit for a customer who is already overdue, and whether to require email validation before confirming a credit.
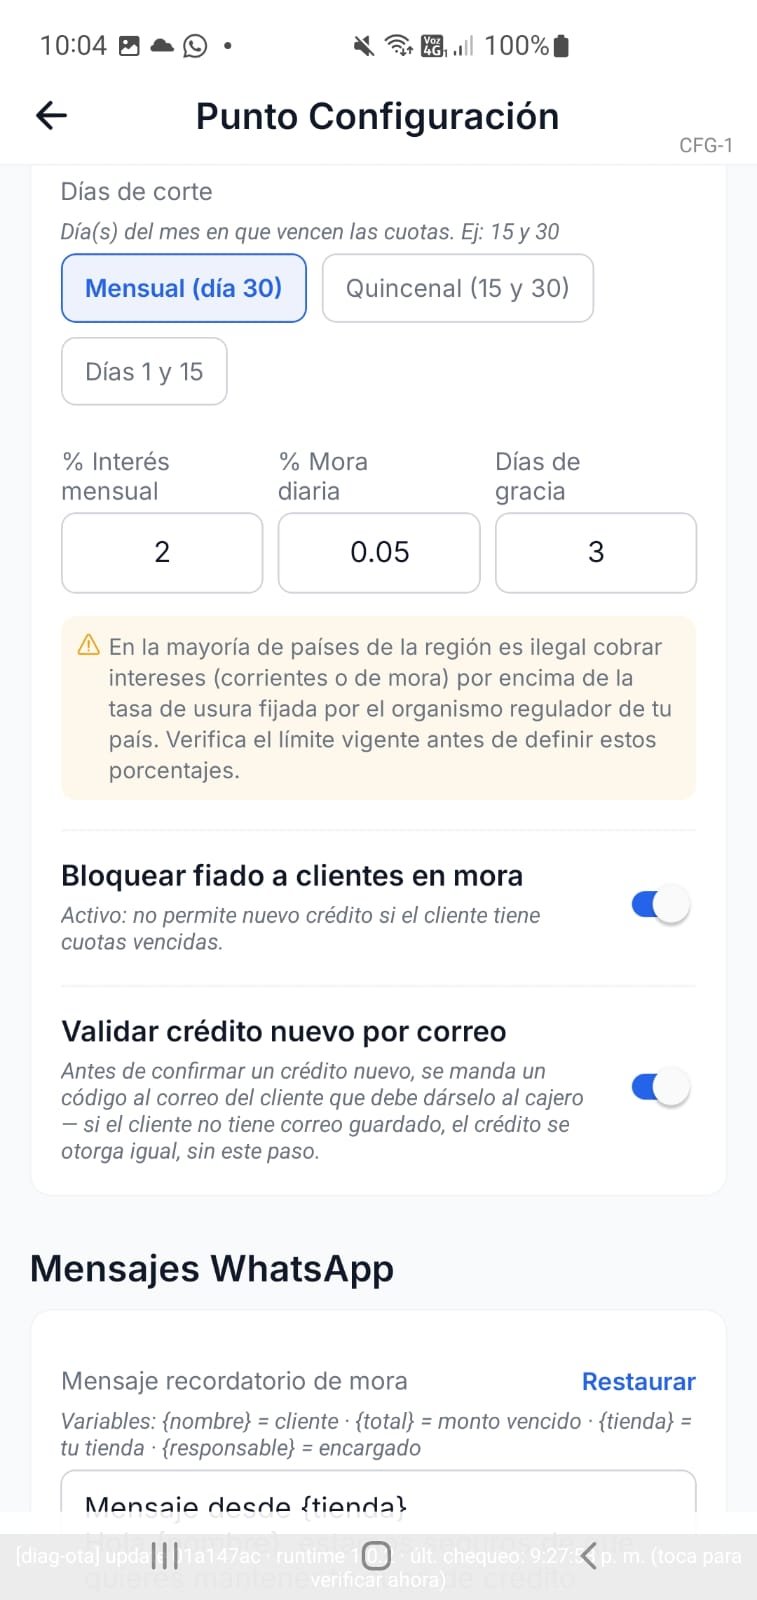
Credit rules, with the email validation toggle on.
WhatsApp messages
Customize the message sent to an overdue customer, with variables like {nombre}, {total} and {tienda} — the screen warns if a key variable is missing.
Loyalty points
If the store's plan includes it, "Loyalty points" appears with the "Set up points" button — see Loyalty points.
My locations
If the store belongs to a company with more than one location, they're listed here — see Company & Locations.
Company & Locations
When the same owner has more than one business.
Every store is created as a Company with a single Location (invisible at sign-up — 99% of accounts never notice this layer). An owner with two businesses (e.g. a restaurant and a bar) can request an additional location under the same company.
Requesting a new location ("Create POS")
- From Settings, the owner chooses the new location's name and the desired plan.
- This generates a request (with a 25% discount for being an additional location) that stays pending until support confirms payment and approves it.
- The new location automatically inherits the owner's same phone number and password — it's not a separate account with its own password.
Logging in with several locations
If the same phone and password match 2 or more locations, the login prompts you to choose which one — it's automatic, nothing needs to be configured beforehand.
Admin Panel ADM-1
For the Nuventa/Multitend team only — administers the entire platform.
A Super Admin doesn't enter any particular store — they go straight into this panel, with 8 tabs:
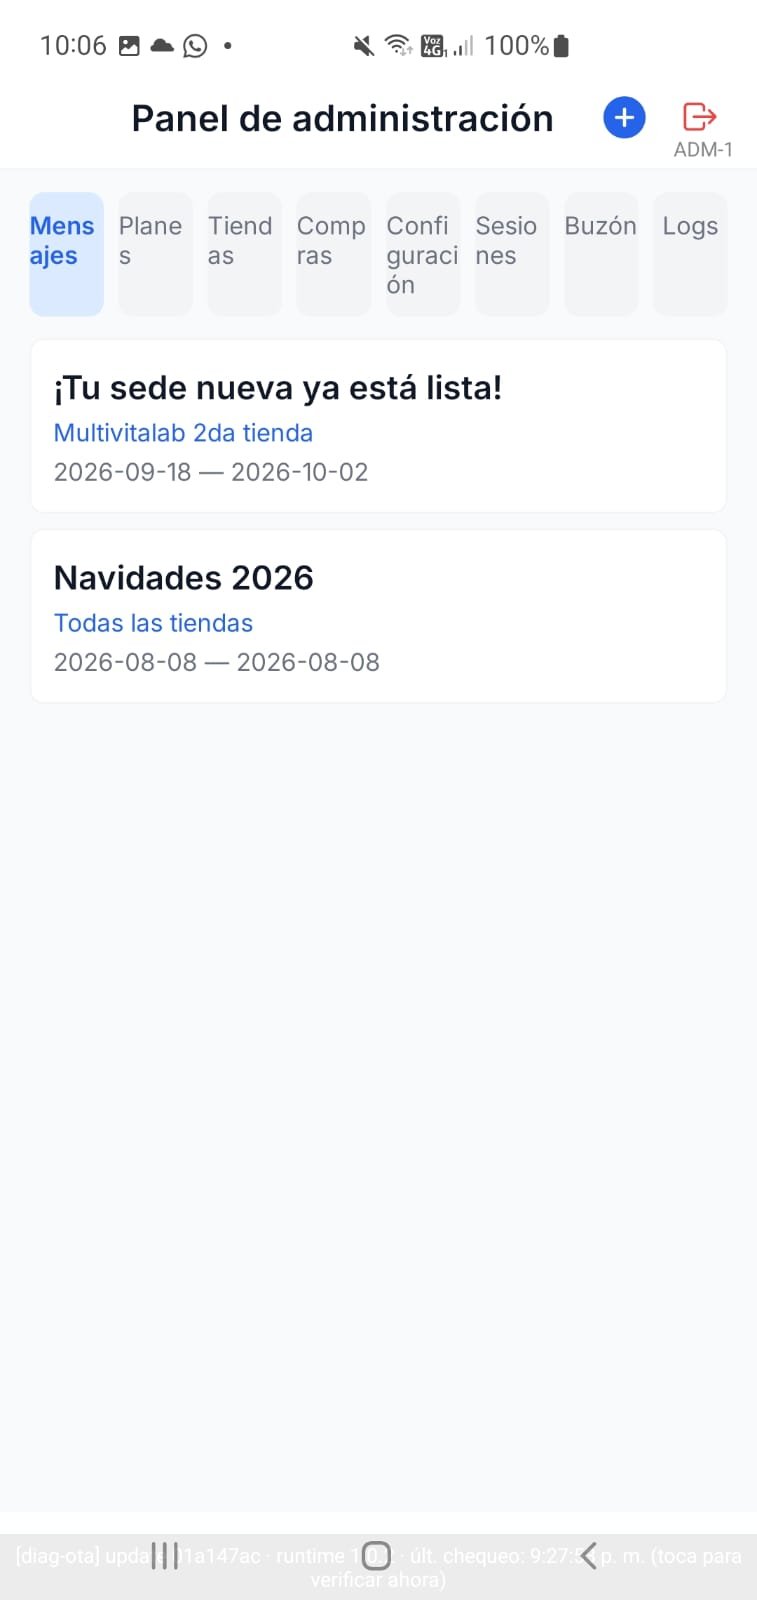
Admin panel, with all 8 tabs.
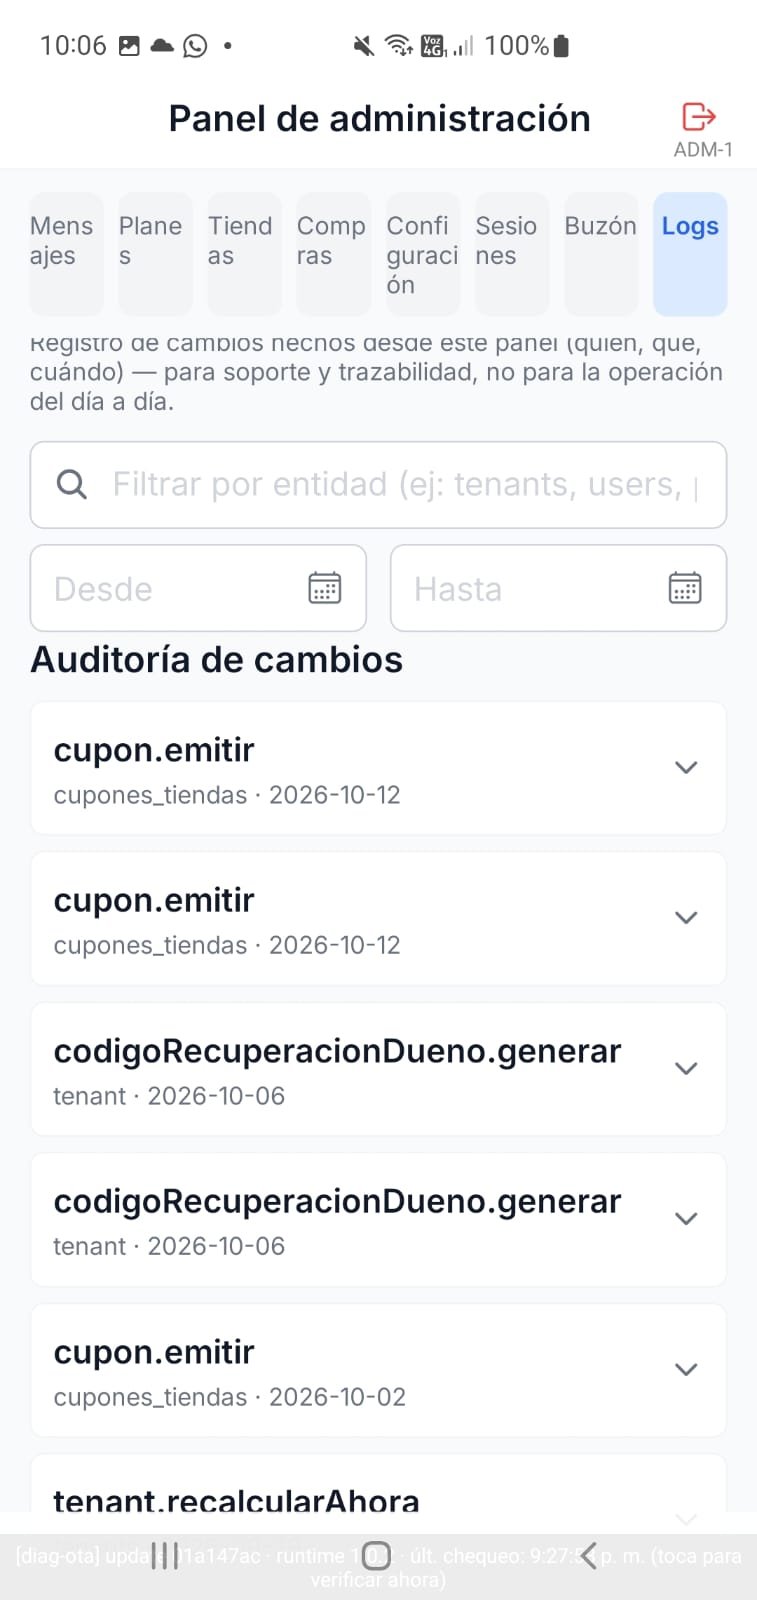
Logs tab: change audit trail, filterable by entity and date.
Quick Guide for Support
How to read a shop owner's report without needing the screen in front of you.
Screen IDs
Every screen in the app shows a small gray code in a corner (e.g. T-1, CFG-1). Asking whoever is reporting an issue for that code identifies exactly which screen they're on, with no ambiguity from naming.
Glossary
- Tenant / Location
- an individual store, with its own products, sales and inventory — completely separate from any other.
- Company
- groups one or more Locations under the same owner.
- Feature
- a function that's enabled or not depending on the paid plan (Costs, Reports, Combos, Promotions, Suppliers, granular permissions, Loyalty points, number of users, credit limit).
- Coupon
- the internal record that activates a plan on a store, with its expiration date — never edited, only voided and a new one issued.
- CUFE
- Unique Electronic Invoice Code — the identifier that makes a real electronic invoice verifiable with the DIAN.
- Frozen sale
- a sale that's been built but not yet paid for, waiting in the In Service queue.
- WAC
- Weighted Average Cost — the product cost the system uses to calculate profit, updated with every new purchase.